Tampilkan postingan dengan label wood. Tampilkan semua postingan

Minggu, 19 Juni 2016

Reader Tips Neills Bike Tube Wood Clamp

Todays post is a tip from reader and whatchagotics expert, Neill Goltz, who came up with a great way to repurpose old bike tubes.  He says:
I just had a wonderful result repairing an old bureau (with mirror) where the laminate exterior had gone bad, i.e., was coming up off the underlying wood on the surface of the main drawer.

Not shilling for a particular product, but I used Gorilla brand wood glue. (Im sure that Elmers would work just as well here. Or perhaps readers of this site already know how to make their own? Horses hooves? Not going there…)

Anyway, two possible points of interest to your blog-readership.

How to apply a clamp - and what kind to a large drawer. Didn’t want to take it apart…

Working with glue is messy, and it extrudes from the seams once the clamp is applied.

The solutions:

As a clamp item I used old bicycle tires freely given by the owner of the local shop. They wrap beautifully around any unusual configuration and can be adjusted to any lengths and tension all the way around the project, in this case the drawer.

I just put a loop in one end, and thread the other end thru and pulled to desired tension. [I] recommend that you put "Shoe-Knot loop" thru on the second tie off so as to release it very easily when glue is dry.? 

 I wanted to create a barrier-layer between the glue (which would extrude) and the tubes. A magazine cover or ordinary cardboard would be adhered to by the glue, so I tried the cellophane wrapper from a box of Cheerios.

Photo credit: Neill Goltz.

Voila! The results could not be better. [Excess glue can be removed with] water-based OOPS or GOOF-OFF. Its water-based, but I still use rubber gloves.?

Photo credit: Neill Goltz.

Jakes Note: there are multiple formulations of those paint removers; some are water-based, some are not.  Definitely wear gloves with all of them!
Great work repairing your bureau drawer, and thanks for sharing the story, Neill!


Sabtu, 21 Mei 2016

Wood Ash Leavening Chemistry An Extraction of Historical Accounts

Leigh over at 5 Acres and a Dream recently did a fascinating series of blog posts on producing leavening from wood ashes (Part 1, Part 2, and Part 3).  The high-level overview is that wood ashes contain potassium carbonate, which can be extracted and used as leavening for quick breads, biscuits, etc., similar to how baking soda is used.

Leigh made some pretty tasty-and-leavened-looking biscuits with her extracted carbonate (and with straight wood ash), but noted that they didnt rise quite as well as the control biscuit (which had baking soda).  There were also a few unanswered questions on the chemistry involved, so we wanted to follow our nerdy instincts and dive into the nitty gritty of whats happening at the molecular level.

First issue: what is actually being extracted from the wood ashes?  Carbonates, we suspect, but is that it?  In our minds, theres a controversy, since the process of extracting carbonates for leavening sounds an awful lot like the process of extracting lye (potassium hydroxide, KOH, in this case) for soap making.  Were especially keen on figuring this out because if both hydroxides and carbonates are present, it will change our biscuit recipe (specifically, well have to add more acid to get the leavening effect). Lets compare some descriptions.

 The very cool Caveman Chemistry website says that the major components of wood ashes are potassium and sodium carbonates, but says this of the extract:
"It contains all of the soluble materials which were present in the the ashes to begin with. This could include sodium and potassium chlorides, sulfates, hydroxides, and carbonates."
So, it sounds like both carbonates and hydroxides could be present.  Another account of potash and pearlash production from 1866 is generally consistent with that (despite a distinct lack of cavemen in 19th century North America), but doesnt mention hydroxides:

"Carbonate of potash is generally obtained from wood ashes...the soluble constituents of the ashes are the carbonate, sulphate, phosphate, and silicate of potash and chlorides of potassium and sodium.  The insoluble constituents are carbonate and subphosphate of lime, alumina, silica, the oxide of iron and manganese, and a dark carbonaceous matter."

That same account also describes the process for preparing the potash and pearlash:

"In America, the ashes are lixiviated [extracted] in barrels with lime, and the solution evaporated in large iron pots or kettles, until the mass has become a black color and the consistency of brown sugar.  In this state it is called, by American manufacturers, black salts.  ... To make the substance called pearlash, the mass called black salts...is transferred from the kettle to a large oven-shaped furnace, constructed so that the flame is made to play over the alkaline mass. ... The ignition is in this way continued until the combustible impurities are burnt out, and the mass, from being black, becomes dirty bluish-white, having somewhat of a pearly lustre, whence the name pearlash. The coloring matter is probably in this case manganate of potash."
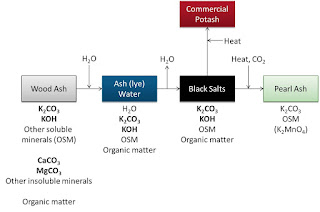
In a process flow diagram, it would look something like this:

Pearlash historical production process flow diagram
Other soluble minerals (OSM) seemed like a better acronym than Minerals of Unusual Solubility (MOUS). (Warning: obscure pop culture reference.)  You can buy pure potassium carbonate these days, and its bright white.  To visualize the color of pearl ash, think of this color, but very faint.

So, no mention of potassium hydroxide in the old-time production, but that might be because of the production method.  The CO2 in the combustion gases that are passing over the black salts reacts with KOH to make KHCO3 (or to make H2O and K2CO3); any KHCO3 produced decomposes to K2CO3 in the heat.  So basically, if hydroxides are extracted into the ash water, they dont make it into the pearlash.

But, compare the process of making ash water for leavening with any of several similar descriptions of the process for preparing lye for making soap.  For example, this one:

"Traditionally, one uses an old wooden barrel or lye hopper for this, even hollow treetrunks in some areas. ... In the bottom, put a filter made from a couple of inch depth of twigs, and the same again of straw or hay. This helps ensure the lye comes off moderately clear. Stand the lye barrel up high enough to get a container underneath...and fill it up with those ashes. Add water. ... Leave it all overnight...[then] let the lye run out into your container."

Other descriptions call for adding lime (or slaked lime), which we noted increases the hydroxide yield by converting carbonates to hydroxides by the following reaction:

 Ca(OH)2 + K2CO3 = 2 KOH+ CaCO3

There is also a journal article in the peer-reviewed literature, which claims the ratio of hydroxides to carbonates in their crude ash extracts is 92-to-8, and more anecdotal observations that carbonates dont work very well for making soap (but ash water does) and that crude ash extract by itself doesnt do much leavening.  Therefore, it seems very likely that the crude ash water extract contains an appreciable amount of hydroxides along with the carbonates.

So theres the theory--probably both carbonates and hydroxides are present in the ash water.  Fortunately, we dont have to just sit around, dealing in hypotheticals.  We can experimentally measure the amounts of carbonate and hydroxide in the ash water through the magic of titration. (If youve suffered through an analytical chemistry class in college, we hope you didnt just throw up in your mouth a little bit.)

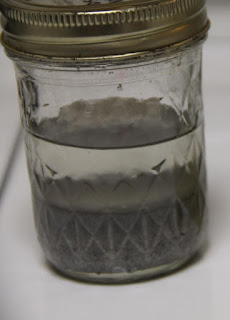
Wood ash and water extract
O ash water, what mysteries containest thou for us to unravel by the labor of titration?

Well give you a few days to stew over that and hit you in a few days with a chemistry-dense post interspersed with colorful pictures.


Rabu, 27 April 2016

Helping Wood Reclaim Its Former Glory

Some weekends, The Lab is a little bit like a firehouse.  We wake up on a Saturday morning, lounge around the kitchen making crepes or putting extra raisins on our oatmeal (because, hey, its Saturday!).  Then all of a sudden, the call will come in.  Not a call call, but an e-mail from IFTTT that reads something like Free wood!  60 feet of weathered cedar fencing, stacked in driveway at [address two miles away].  Will take down posting when gone.

The kitchen erupts with activity.  Pancakes and oatmeal start flying around; some even lands in our mouths if were lucky.  We throw the crosscut saw, drill, hatchet, and crowbar in the station wagon, make sure the ratchet straps are still in there from last time, and peel out of the driveway prepared to do battle with enormous fence sections and other zealots of the Craigslist free section.  (Its close to, but not quite, the level of activity that ensues when Katie finds a large spider in a cupboard.)

The only catch is that the wood usually looks like an 85-year-old former boxer.  Jagged, beat up, dirty, limbs falling off...you get the idea.  And who would want to make a shelf or a table out of an 85-year-old former boxer?  Well, we would!  All it takes is a little elbow grease and/or some specific tools, and that old wood will be back in shape in no time.  It might even have some extra character scars to serve as an artistic reminder of its former life.


In case you have the same vehicle for hauling reclaimed wood as we do, 60 feet of dismantled cedar fencing is about the maximum that a Saturn SW2 can hold.

Our first step is to dismantle the wood down to the raw boards.  Pull nails, remove screws, toss scraps into the burn pile.  The bent, rusty nails and screws will add up quickly, but can be taken to a scrapyard to recover some of the cost of your effort if theyre not reusable.  Other folks say that burying them around fruit trees will help replenish iron in the soil, but beware of anything thats not rusty-looking, since it probably has some kind of corrosion inhibitor added, such as a zinc- or polymer-based coating (or both), which will keep the iron from getting into the soil while adding toxic (zinc) or plastic junk to your dirt.

Then, the boards.  Occasionally, a board will be fit for use as-is.  If its not too splintery or dirty and the intended application isnt too cuddly, the board can go directly to any number of reclaimed wood projects.  But what if we need a closet shelf that wont snag sweaters, a nightstand that doesnt go bump in the night, or counter top to use as a kitchen workspace?


Enter the bench top planer.  (It works just as well on a garage floor or in an apartment living room as on a bench top.)  We got it for $50 on Craigslist, and its the key to getting the wood from something someone would leave in their driveway for free to something Katie would allow in the house.  This particular planer can handle boards up to 5" thick.  For boards that are thicker than that (e.g., a 1 x >5), we set up our router table to be a jointer or just use a hand plane.


Usually a single pass will take off all the surface splinters and dirt.  A second or third pass takes out most of the remaining dings, leaving just a few artistic nail holes.  (Top = before, bottom = after.)  Its important to measure the new dimensions of the boards once they look nice, since the planer can remove anywhere from 1/32" up to 1/8" per pass.  Projects dont fit together nearly as nicely with an extra 1/8" on the end of every board, even if you do cut the wood square!

For Jakes projects, everything at this point gets screwed, glued, and called done!   The shelf boards in this closet shelf are sections of old cedar fence planks that are probably too thin for almost any other application. (Maybe shimming door jambs would be ok.)

For Katies projects there are a few extra steps like sanding and/or staining.

This is Katies end table before sanding.  What a beaut!

2 x 4s seem to be the most readily available form of free wood, which is great if you want to build a butcher block-style counter top or something similarly sturdy.  This thing will be heavy as heck, but able to withstand plenty of pounding!   In the background, a pile of unusable wood is visible.  Those are boards that are too warped, too short (i.e., scraps), or occasionally, too punky.  But for us, its a beneficial side effect of collecting free boards because it provides a continuous supply of bone-dry firewood for heating the workspace.


What steps do you take when working with abandoned wood?  What are your favorite reclaimed wood projects?  Let us know in the comments section below!
 

Aquaponics at Home Copyright © 2016-2022 -- Powered by Blogger