Minggu, 12 Oktober 2025

100+ Aquaponics Commercial Farming

Commercial aquaponics • nelson & pade aquaponics aquaponics.com

Opening: Aquaponics for Everyone! Want to grow fresh food and raise fish simultaneously? Aquaponics, the combination of aquaculture (raising aquatic animals) and hydroponics (growing plants without soil), is a sustainable and rewarding method. This guide provides a step-by-step process for building a basic DIY aquaponics system that's perfect for beginners.
Step 1: Planning Your System Before diving in, consider the scale of your project and where you'll place it. Think about sunlight exposure, access to water and electricity, and the type of plants and fish you'd like to grow. A small system is ideal for learning the ropes. Here's what you'll generally need:
  • A fish tank or container.
  • A grow bed to hold the plants.
  • A water pump.
  • Piping to connect the tank and grow bed.
  • Grow media (clay pebbles, gravel, etc.).
  • Seeds or seedlings.
Step 2: Gathering Materials Once you have a plan, it's time to collect your supplies. A popular starting setup uses a 20-gallon fish tank and a similarly sized plastic tote for the grow bed. Don't forget the essential components:
  • Fish tank (glass or plastic).
  • Grow bed (plastic tote).
  • Submersible water pump (check flow rate for your system size).
  • PVC pipe and fittings (for plumbing).
  • Grow media (clay pebbles are recommended).
  • Air pump and air stone (for fish oxygenation).
  • Fish food.
  • Water testing kit (ammonia, nitrite, nitrate, pH).
Step 3: Building the Grow Bed The grow bed will house your plants.
  • Drill drainage holes in the bottom of the grow bed. Ensure they're small enough to prevent media from escaping but large enough to allow water to drain freely.
  • Place the grow bed above the fish tank. You can use cinder blocks, a table, or build a simple wooden frame. Gravity will assist with water return.
  • Consider adding a siphon system (bell siphon or auto-siphon) to your grow bed. This will create a flood and drain cycle, which is beneficial for plant root oxygenation. There are numerous tutorials online demonstrating how to build simple siphons. If not using a siphon ensure the water can drain sufficiently with the drainage holes.
Step 4: Plumbing the System Connect the fish tank and grow bed with piping.
  • Place the submersible water pump in the fish tank.
  • Attach a section of PVC pipe to the pump outlet.
  • Run the pipe up to the grow bed.
  • Position the outlet pipe so the water disperses evenly across the grow bed.
  • Create a return pipe from the grow bed back to the fish tank. If you have a siphon, this is where the siphon will drain. If you do not have a siphon ensure this pipe flows easily with a good gradient to reduce blockages.
Step 5: Preparing the Fish Tank Get the fish tank ready for your aquatic friends.
  • Thoroughly clean the fish tank. Do not use soap or detergents.
  • Place the air pump and air stone in the tank to provide oxygen.
  • Fill the tank with dechlorinated water. Tap water contains chlorine and chloramine, which are harmful to fish. You can use a dechlorinating solution or let the water sit for 24-48 hours to allow the chlorine to evaporate.
  • Cycle the tank. This establishes beneficial bacteria that convert fish waste into plant nutrients. This is crucial and may take 4-6 weeks. Add a small amount of ammonia (fish food will decompose into ammonia) and monitor ammonia, nitrite, and nitrate levels using a water testing kit. When ammonia and nitrite levels drop to zero and nitrate levels rise, the tank is cycled.
Step 6: Setting Up the Grow Bed Prepare the grow bed for planting.
  • Rinse the grow media thoroughly to remove dust and debris.
  • Fill the grow bed with the rinsed grow media.
Step 7: Introducing Fish and Plants Once the system is cycled, you can add fish and plants.
  • Introduce the fish gradually to avoid shocking them. Float the bag they came in inside the tank for about 30 minutes to equalize the temperature. Then, slowly add tank water to the bag over another 30 minutes before releasing them. Start with a small number of fish to avoid overloading the system. Good beginner fish include goldfish, tilapia (check local regulations), or koi.
  • Plant seeds or seedlings in the grow bed. Ensure the roots are in contact with the grow media. Good starter plants include lettuce, herbs (basil, mint), and leafy greens (spinach, kale).
Step 8: Monitoring and Maintenance Regular monitoring and maintenance are essential for a healthy aquaponics system.
  • Test the water regularly (at least once a week) for ammonia, nitrite, nitrate, and pH. Adjust as needed to maintain optimal levels for both fish and plants.
  • Feed the fish regularly with appropriate fish food. Follow the feeding instructions on the food packaging.
  • Remove any dead plant matter from the grow bed.
  • Clean the fish tank and grow bed periodically to remove debris.
  • Top up the water level as needed due to evaporation.
Conclusion: Enjoying Your Aquaponics System Congratulations, you've built your own DIY aquaponics system! With a little care and attention, you can enjoy fresh, homegrown produce and healthy fish. This is a fantastic learning experience and a step toward sustainable food production. As you gain experience, you can expand your system and experiment with different plants and fish. Happy growing!

Commercial Aquaponics Online Course

Commercial aquaponics online course aquaponics.com

Commercial Aquaponics • Nelson & Pade Aquaponics

Commercial aquaponics • nelson & pade aquaponics aquaponics.com

Commercial Aquaponics • Nelson & Pade Aquaponics

Commercial aquaponics • nelson & pade aquaponics aquaponics.com

Sabtu, 11 Oktober 2025

64+ Low Light Plants For Aquaponics

Cherry vanilla bourbon barbecue ribs urbancowgirllife.com

```html
Introduction: Embracing Aquaponics with Low-Light Plants Aquaponics, the symbiotic fusion of aquaculture and hydroponics, offers a sustainable and rewarding way to grow food. However, not everyone has access to ample sunlight. Fortunately, a variety of plants thrive in low-light conditions, making aquaponics accessible even in less illuminated spaces. This guide provides a step-by-step approach to cultivating low-light-loving plants in your aquaponics system.
Step 1: Planning Your System
  • Assess your available space and light levels. This will determine the size and type of aquaponics system you can implement.
  • Choose the right system type: Deep Water Culture (DWC), Nutrient Film Technique (NFT), or Media Beds can all be adapted for low-light environments.
  • Research suitable low-light plants: Select plants known for their tolerance to shade or partial shade.
  • Step 2: Choosing the Right Fish
  • Tilapia are often used, but research your local regulations regarding tilapia.
  • Consider fish that can tolerate varying water conditions and contribute effectively to the nutrient cycle.
  • Step 3: Constructing Your Aquaponics System
  • DWC Setup: Use a container (e.g., a plastic tote) filled with water. Suspend plant roots in the water using net pots and rafts (foam boards). An air pump and air stone will oxygenate the water.
  • NFT Setup: Build a series of channels or pipes with a slight slope. A pump circulates nutrient-rich water from the fish tank up to the channels, where the plants' roots absorb the nutrients. The water then flows back to the fish tank.
  • Media Bed Setup: A grow bed filled with gravel or clay pebbles is positioned above the fish tank. Water is pumped from the fish tank into the grow bed, where the plants' roots absorb nutrients. The water then drains back into the fish tank.
  • Step 4: Setting Up Lighting (If Needed)
  • Even low-light plants benefit from supplemental lighting. Consider using LED grow lights, which are energy-efficient and emit minimal heat.
  • Position the lights appropriately above the plants, ensuring even coverage.
  • Start with a moderate light schedule (e.g., 12-14 hours per day) and adjust based on plant growth.
  • Step 5: Planting and Planting Procedure
  • Start with healthy seedlings or cuttings for optimal results.
  • For DWC, gently rinse the roots of the seedlings and place them in net pots filled with clay pebbles or rockwool.
  • For NFT, carefully position the seedlings in the channels, ensuring the roots are exposed to the flowing water.
  • For Media Beds, plant the seedlings directly into the grow media, taking care not to damage the roots.
  • Step 6: Monitoring and Maintaining Your System
  • Regularly check water parameters (pH, ammonia, nitrite, nitrate) and adjust as needed.
  • Maintain water quality by performing partial water changes.
  • Monitor plant health for signs of nutrient deficiencies or pests.
  • Prune plants as needed to promote growth and air circulation.
  • Ensure the fish are healthy and well-fed.
  • Step 7: Suitable Low-Light Plants Examples
  • Leafy Greens: Lettuce varieties (Butterhead, Romaine), Spinach, Kale, Arugula.
  • Herbs: Mint, Parsley, Chives, Cilantro.
  • Other: Watercress, Celery, Bok Choy.
  • Conclusion: Harvesting the Rewards of Low-Light Aquaponics By carefully planning your system, selecting appropriate plants, and providing supplemental lighting when necessary, you can successfully cultivate a thriving aquaponics garden even in low-light conditions. Enjoy the fresh, homegrown produce and the satisfaction of a sustainable and eco-friendly food production system. Remember to research each plant's specific needs for optimal growth and yields.
    ```

    Slow Cooker Pork Ribs

    Slow cooker pork ribs slowcookingperfected.com

    The Ultimate Slow Cooker Dr. Pepper Bbq Ribs: Your Mouthwatering Recipe Guide

    The ultimate slow cooker dr. pepper bbq ribs: your mouthwatering recipe guide 1krecipes.com

    Cherry Vanilla Bourbon Barbecue Ribs

    Cherry vanilla bourbon barbecue ribs urbancowgirllife.com

    Jumat, 10 Oktober 2025

    70+ Diy Aquaponics Aquarium

    Diy step by step projects ar.inspiredpencil.com

    Introduction to Aquaponics Aquariums Aquaponics is a symbiotic system combining aquaculture (raising aquatic animals) and hydroponics (growing plants without soil). This DIY guide will walk you through building a small-scale aquaponics aquarium, perfect for beginners. It's a fantastic way to grow fresh herbs or vegetables while providing a healthy environment for your fish!
    Materials You'll Need
    • Aquarium: A 10-gallon or larger aquarium is recommended.
    • Grow Bed: A plastic container that fits on top of the aquarium. It should be food-grade.
    • Grow Media: Clay pebbles, gravel, or lava rock for the grow bed.
    • Water Pump: A small submersible pump to circulate water.
    • Tubing: To connect the pump to the grow bed and back to the aquarium.
    • Air Pump & Air Stone: To oxygenate the water for the fish.
    • Aquarium Heater (optional): If needed for the specific fish you choose.
    • Fish: Choose fish suitable for small aquariums, such as goldfish or bettas (for small systems with careful plant selection). Research compatibility carefully.
    • Plants: Leafy greens like lettuce, spinach, and herbs like basil and mint are great choices.
    • Silicone Sealant (aquarium safe): To seal any holes you drill.
    • Drill & Drill Bits: For creating holes in the grow bed for drainage.
    Step 1: Preparing the Grow Bed Using the drill, create drainage holes in the bottom of the grow bed. Space them evenly and make sure they are large enough to allow water to drain freely but small enough to prevent grow media from falling through. Seal the edges of the drilled holes with aquarium-safe silicone sealant to prevent leaks. Allow the sealant to cure completely before moving on.
    Step 2: Setting Up the Aquarium Place the aquarium in a stable location, away from direct sunlight. Fill the aquarium with dechlorinated water. Use a water conditioner to remove chlorine and chloramine. Add the air pump and air stone to oxygenate the water. If needed, install the aquarium heater and set it to the appropriate temperature for your chosen fish.
    Step 3: Connecting the Pump and Tubing Place the submersible pump inside the aquarium. Attach one end of the tubing to the pump's outlet. Run the tubing up to the grow bed and position the open end above the grow media. This will be where the water is pumped into the grow bed. Attach another piece of tubing to a drainage hole in the grow bed and run it back into the aquarium. This will return the water after it filters through the grow bed.
    Step 4: Setting Up the Grow Bed Place the grow bed on top of the aquarium, ensuring it's stable and secure. Rinse the grow media thoroughly to remove any dust or debris. Fill the grow bed with the rinsed grow media.
    Step 5: Starting the System Plug in the water pump and observe the water flow. Adjust the pump's flow rate if necessary to ensure the grow bed is adequately watered but not overflowing. Let the system run for a few days to allow the water to cycle and establish beneficial bacteria. You can add a small amount of ammonia (fish food works) to kickstart the nitrogen cycle.
    Step 6: Adding Fish and Plants After the water has cycled (test regularly for ammonia, nitrites, and nitrates), you can add your fish gradually. Introduce them slowly to minimize stress. Plant your chosen herbs or vegetables in the grow bed. Ensure their roots are in contact with the grow media.
    Step 7: Maintenance Regularly monitor the water quality, including pH, ammonia, nitrites, and nitrates. Perform partial water changes (around 25%) weekly to maintain water quality. Add water as needed to compensate for evaporation. Clean the grow bed occasionally to remove any accumulated debris. Feed your fish appropriately, avoiding overfeeding. Trim the plants as needed to encourage growth and prevent overcrowding.
    Conclusion Congratulations! You've built your own DIY aquaponics aquarium. With proper care and maintenance, you can enjoy fresh herbs and vegetables while creating a thriving ecosystem for your fish. Remember to research your chosen fish and plants to ensure their compatibility and optimal growth conditions. Enjoy your sustainable aquaponics system!

    30 Diy Storage Ideas For Your Art And Crafts Supplies

    30 diy storage ideas for your art and crafts supplies www.diys.com

    40 Diy Upcycled And Repurposed Furniture Ideas

    40 diy upcycled and repurposed furniture ideas www.prudentpennypincher.com

    Diy Step By Step Projects

    Diy step by step projects ar.inspiredpencil.com

    Kamis, 09 Oktober 2025

    108+ Aquaponics Carp

    What are aquaponics? www.greenlife.co.ke

    ```html
    Introduction: Building Your Own Aquaponics System for Carp Are you interested in a sustainable food production method that combines aquaculture and hydroponics? Building an aquaponics system for carp can be a rewarding project. Carp are hardy fish well-suited for aquaponics, and the system can provide you with fresh vegetables and protein. This guide will walk you through the steps to create your own DIY aquaponics setup.
    Step 1: Planning and Design Before you begin building, you need to plan your system carefully. Consider the following factors:
  • System Size: Determine the desired size of your fish tank and grow bed based on available space and production goals.
  • System Type: Choose between Deep Water Culture (DWC), Media Beds, or Nutrient Film Technique (NFT) depending on your experience and resources. Media beds are generally the easiest for beginners.
  • Materials: Make a list of all necessary materials (fish tank, grow bed, plumbing, pump, media, etc.) and calculate their costs.
  • Location: Select a location that receives adequate sunlight (or be prepared to use grow lights) and is accessible for maintenance.
  • Step 2: Gathering Materials Once you have a design, gather the necessary materials. Here's a basic list for a media bed system:
  • Fish tank (food-grade plastic or glass)
  • Grow bed (plastic tub or container)
  • Water pump (submersible, sized appropriately for your system)
  • Air pump and air stone
  • Plumbing fittings and tubing (PVC or flexible tubing)
  • Grow media (gravel, clay pebbles, or lava rock)
  • Bell siphon (or other auto-siphon system)
  • Seeds or seedlings
  • Water testing kit (pH, ammonia, nitrite, nitrate)
  • Step 3: Constructing the System Now it's time to build! Follow these steps:
  • Tank Setup: Place the fish tank in its designated location. Ensure it is level and stable.
  • Grow Bed Setup: Position the grow bed above the fish tank or adjacent to it, considering the water flow path.
  • Plumbing: Connect the water pump to the fish tank. Run tubing from the pump to the grow bed to deliver nutrient-rich water.
  • Drainage: Install a bell siphon or other auto-siphon system in the grow bed to drain water back into the fish tank. This creates a flood-and-drain cycle.
  • Aeration: Place the air stone in the fish tank and connect it to the air pump. This provides oxygen for the fish and beneficial bacteria.
  • Step 4: Cycling the System Cycling the system is crucial to establish a healthy ecosystem. This process involves building up beneficial bacteria that convert fish waste into nutrients for the plants.
  • Fill the System: Fill the fish tank and grow bed with water.
  • Add Ammonia: Add a source of ammonia (fish food or pure ammonia) to the fish tank to start the nitrogen cycle.
  • Monitor Water Parameters: Test the water regularly for ammonia, nitrite, and nitrate.
  • Wait for the Cycle: The cycling process can take several weeks. You'll know the cycle is complete when ammonia and nitrite levels reach zero and nitrate levels are present.
  • Step 5: Adding Fish and Plants Once the system is cycled, you can introduce fish and plants.
  • Introduce Carp: Gradually acclimate the carp to the tank water before releasing them. Start with a small number of fish to avoid overwhelming the system.
  • Planting: Plant your seeds or seedlings in the grow media. Choose plants that thrive in aquaponics systems, such as leafy greens, herbs, and tomatoes.
  • Step 6: System Maintenance Regular maintenance is essential for a healthy aquaponics system.
  • Water Testing: Test the water pH, ammonia, nitrite, and nitrate levels regularly and adjust as needed. Aim for a pH between 6.0 and 7.0.
  • Water Changes: Perform partial water changes (10-20%) regularly to remove excess nutrients and maintain water quality.
  • Feeding: Feed the fish a balanced diet appropriate for their size and species.
  • Plant Care: Provide adequate light, nutrients, and support for the plants.
  • Cleaning: Clean the fish tank and grow bed periodically to remove debris and algae.
  • Conclusion: Enjoying Your Aquaponic System Building an aquaponics system for carp is a challenging but rewarding project. With careful planning, construction, and maintenance, you can create a sustainable food production system that provides fresh fish and vegetables. Remember to research and adapt the methods to your specific environment and resources. Happy aquaponics!
    ```

    What Are Aquaponics?

    What are aquaponics? www.greenlife.co.ke

    Vertical Vegetable Aquaponics

    Vertical vegetable aquaponics www.plantsonwalls.com

    Aquaponics System: Everything You Ever Wanted To Know

    Aquaponics system: everything you ever wanted to know agrierp.com

    Rabu, 08 Oktober 2025

    132+ Diy Aquaponics Aquarium

    Diy step by step projects ar.inspiredpencil.com

    ```html
    Introduction: Combining Fish and Plants in Harmony Ever wanted a self-sustaining ecosystem in your home? Aquaponics is a fantastic way to combine aquaculture (raising fish) and hydroponics (growing plants without soil) into one symbiotic system. This guide will walk you through building a simple DIY aquaponics system using an aquarium.
    Materials You'll Need: To get started, gather the following materials:
    • An aquarium (10 gallons or larger is recommended)
    • A grow bed (a container to hold your plants, slightly smaller than the aquarium)
    • Grow media (clay pebbles, lava rock, or similar)
    • A submersible water pump (rated for the height between your aquarium and grow bed)
    • Tubing to connect the pump to the grow bed
    • An air pump and air stone (for oxygenating the water in the aquarium)
    • Fish (goldfish, guppies, or other hardy freshwater fish)
    • Plant seedlings (lettuce, herbs, or other leafy greens)
    • Optional: Siphon or timer for flood and drain system
    Step 1: Setting Up the Aquarium Begin by cleaning your aquarium thoroughly with water only (no soap!). Place the aquarium in a location with indirect sunlight. Fill the aquarium with dechlorinated water. Install the air pump and air stone to provide oxygen for the fish. Let the water cycle for a few days before adding fish. This allows beneficial bacteria to establish.
    Step 2: Building the Grow Bed Prepare your grow bed by cleaning it. If you are using a solid container, make sure it has drainage holes. Fill the grow bed with your chosen grow media, leaving a few inches of space at the top. This provides a surface for the plants to root and filters the water.
    Step 3: Connecting the Plumbing Place the submersible water pump inside the aquarium. Attach one end of the tubing to the pump's outlet. Run the tubing up to the grow bed and position it so the water will be distributed evenly across the grow media. Optionally, you can use a spray bar or diffuser.
    Step 4: Choosing Your System Type: Continuous Flow vs. Flood and Drain You have two main options for water flow:
    • Continuous Flow: The pump runs continuously, delivering a slow, steady stream of water to the grow bed.
    • Flood and Drain: The pump runs intermittently, flooding the grow bed and then allowing it to drain back into the aquarium. This can be achieved with a timer or a siphon. A siphon will automatically flood and drain without electricity, but requires some fine-tuning.
    For beginners, continuous flow is generally easier to set up.
    Step 5: Introducing Fish and Plants After the aquarium water has cycled for a few days, add a small number of fish. Don't overcrowd the tank. Once the fish are acclimated, carefully plant your seedlings in the grow media. Ensure the roots are covered but the base of the plant is above the media.
    Step 6: Monitoring and Maintenance Regularly monitor the water quality in the aquarium. Test for ammonia, nitrite, and nitrate levels. Perform partial water changes (around 25%) every week or two to maintain water quality. Remove any dead leaves or debris from the grow bed. Feed the fish a balanced diet.
    Conclusion: Enjoying Your Aquaponic Ecosystem Congratulations! You've built your own DIY aquaponics system. Over time, the fish waste will provide nutrients for the plants, and the plants will help filter the water for the fish, creating a self-sustaining cycle. Enjoy watching your fish thrive and harvesting fresh, homegrown produce! Remember to adjust your system as needed based on the health of your fish and plants. Happy growing!
    ```

    Diy Builds

    Diy builds www.delineateyourdwelling.com

    Diy Step By Step Projects

    Diy step by step projects ar.inspiredpencil.com

    Cute Easy Wall Drawing Ideas

    Cute easy wall drawing ideas handycolor.vercel.app

    Selasa, 07 Oktober 2025

    139+ Aquaponics Plans

    20 best plants for aquaponics www.treehugger.com

    ```html
    Introduction: Your DIY Aquaponics Journey Begins! Aquaponics, the marriage of aquaculture (raising fish) and hydroponics (growing plants without soil), offers a sustainable and rewarding way to produce your own food. This guide provides a step-by-step approach to building a small-scale aquaponics system perfect for beginners. Get ready to create your own miniature ecosystem!
    Step 1: Planning and Gathering Materials Before you start building, careful planning is essential. Consider the space you have available, the types of plants and fish you want to raise, and your budget. Here's a basic materials list:
  • Fish Tank: A plastic tub or aquarium (minimum 20 gallons for beginners).
  • Grow Bed: A container to hold your plants (a plastic tote or a repurposed container works well).
  • Water Pump: Submersible pump with appropriate flow rate for your system size.
  • Grow Media: Clay pebbles, gravel, or lava rock.
  • Plumbing: Tubing and fittings to connect the fish tank, pump, and grow bed.
  • Air Pump & Air Stone: To oxygenate the water for the fish.
  • Seeds or Seedlings: Choose plants that thrive in aquaponic systems (e.g., lettuce, herbs, strawberries).
  • Fish: Goldfish are a hardy and affordable option for beginners.
  • Siphon (Optional): Bell siphon or auto-siphon for flood-and-drain systems.
  • Tools: Drill, saw (if necessary), measuring tape, and knife.
  • Step 2: Assembling the System – The Basics The most common beginner-friendly aquaponics system is a flood-and-drain setup. Here's how to assemble it:
  • Positioning: Place your fish tank and grow bed near each other. The grow bed usually sits above the fish tank, allowing gravity to assist with water return.
  • Connecting the Pump: Place the submersible pump inside the fish tank. Attach tubing from the pump to the grow bed. This will pump water from the tank to the grow bed.
  • Setting up the Drain: Create a drain in the grow bed that allows water to flow back into the fish tank. This can be a simple hole with a screened pipe, or a more sophisticated siphon system (explained below).
  • Filling the Grow Bed: Fill the grow bed with your chosen grow media (clay pebbles, gravel, etc.). Rinse the media thoroughly to remove any dust or debris.
  • Adding the Water and Air Pump: Fill the fish tank with dechlorinated water. Place the air stone in the fish tank and connect it to the air pump. Turn on both the water pump and the air pump.
  • Step 3: Siphon Options (Optional but Recommended) A siphon automates the flooding and draining of the grow bed, providing plants with nutrients and oxygen. Two common options are:
  • Bell Siphon: This requires a bell-shaped cover over the drain pipe and a slightly more complex setup. Numerous tutorials are available online demonstrating how to build a bell siphon.
  • Auto-Siphon: These are pre-made siphons that are easier to install but may be less reliable than a well-constructed bell siphon.
  • Choose the siphon that best suits your skill level and budget. Ensure the siphon cycles properly, flooding the grow bed and then draining it back into the fish tank.
    Step 4: Planting and Introducing Fish
  • Planting: Once your system is running and the water has cycled for a few days, you can introduce your plants. Start with seedlings or seeds that are well-suited for aquaponics, such as lettuce, herbs, or strawberries.
  • Introducing Fish: After the plants have been in the system for a week or two, and the water parameters are stable, you can add your fish. Start with a small number of fish to avoid overloading the system. Goldfish are a good choice for beginners because they are hardy and tolerant of a range of conditions.
  • Step 5: Monitoring and Maintenance Regular monitoring and maintenance are crucial for a healthy aquaponics system.
  • Water Quality: Test the water regularly for pH, ammonia, nitrites, and nitrates. Adjust as needed to maintain optimal levels for both plants and fish.
  • Water Changes: Perform partial water changes (10-20%) every few weeks to remove excess nutrients and maintain water quality.
  • Feeding: Feed your fish regularly with a high-quality fish food.
  • Plant Care: Prune your plants as needed and provide support if necessary.
  • Observation: Regularly observe your plants and fish for any signs of disease or stress.
  • Conclusion: Reap the Rewards of Aquaponics! Building your own DIY aquaponics system is a rewarding experience that combines gardening and aquaculture. With careful planning, construction, and maintenance, you can create a sustainable source of fresh produce and healthy fish. Remember to start small, learn as you go, and enjoy the process of building your own miniature ecosystem! Happy growing!
    ```

    Component Of Aquaponics Systems

    Component of aquaponics systems 
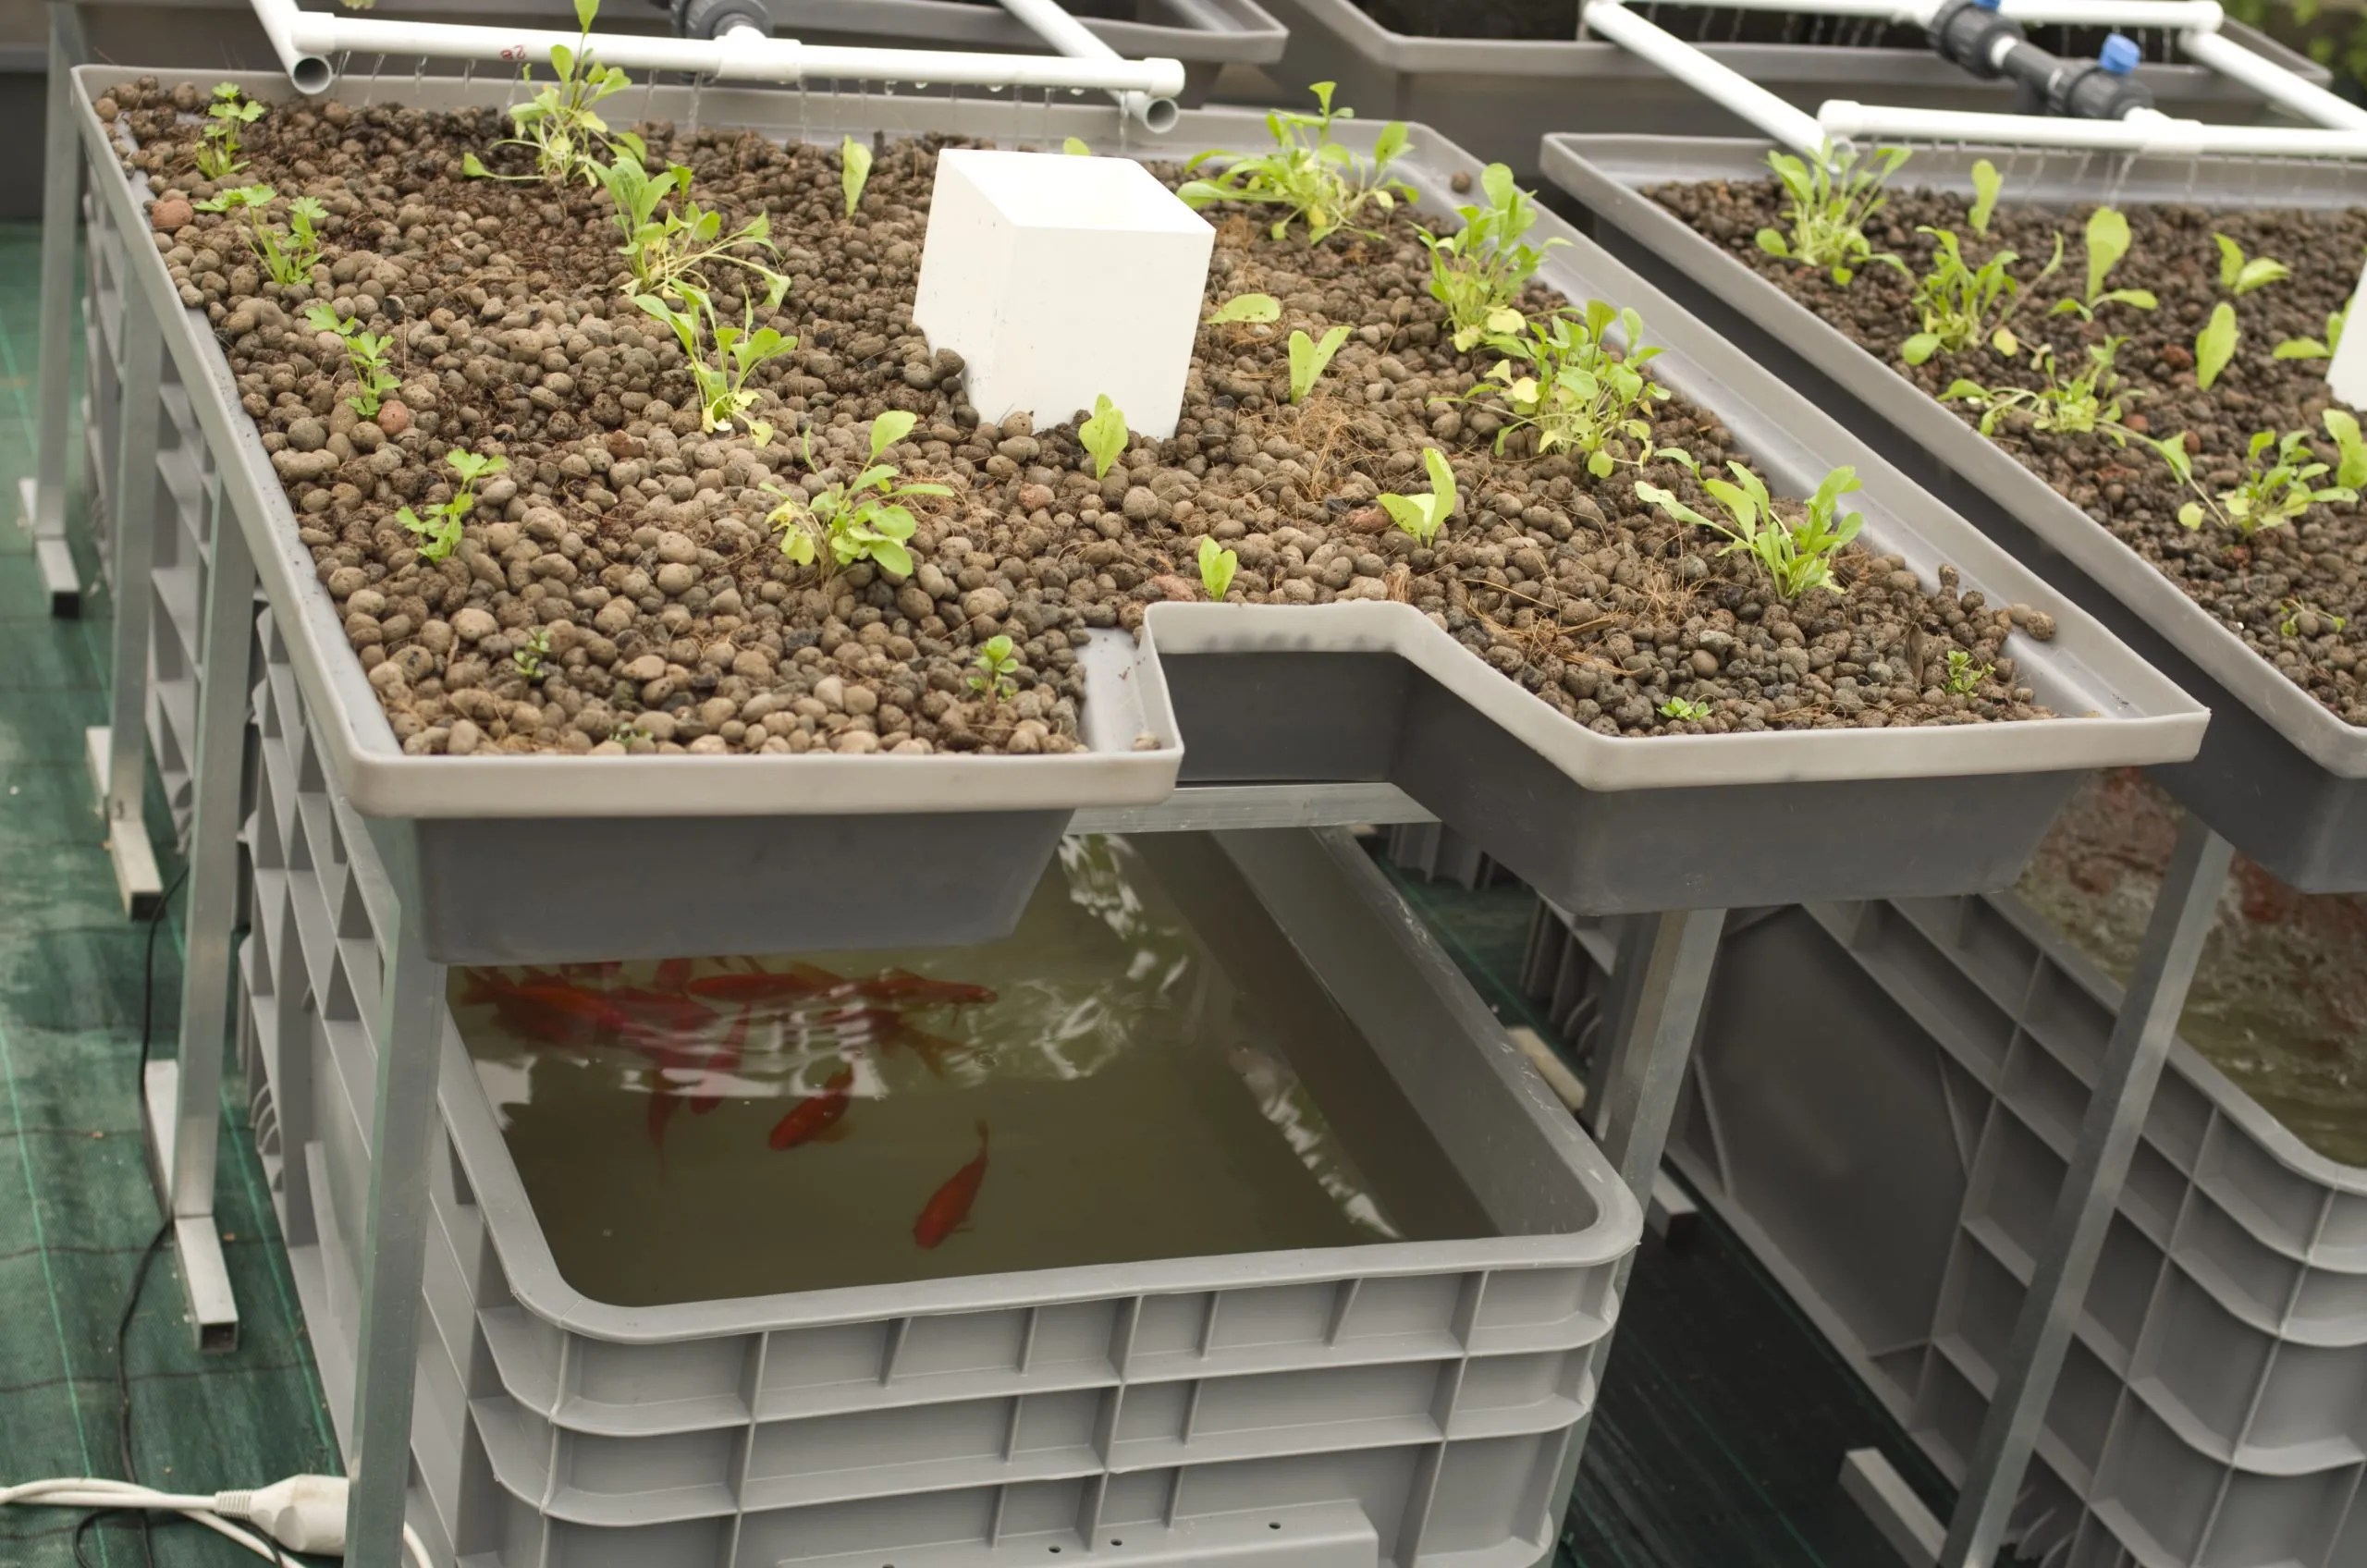
www.aquaponicsforbeginners.com

    Aquaponics-what Is Aquaponics And How Does It Work?

    Aquaponics-what is aquaponics and how does it work? agromoris.com

    20 Best Plants For Aquaponics

    20 best plants for aquaponics www.treehugger.com

    Senin, 06 Oktober 2025

    48+ Aquaponic Fish Garden

    Aquaponic gardening aquaponic-gardening.blogspot.com

    ```html
    Opening: Dive into DIY Aquaponics! Welcome to the fascinating world of aquaponics! This guide will walk you through creating a small-scale aquaponic fish garden, perfect for beginners. You'll learn how to combine fish farming and hydroponics to create a self-sustaining ecosystem. Get ready to grow fresh produce and raise fish simultaneously!
    Materials You'll Need: This is the shopping list to gather all that you need
    • Fish Tank: A 10-20 gallon aquarium is a great starting size.
    • Grow Bed: A plastic container or bin that sits above the fish tank, large enough to hold your chosen grow media.
    • Water Pump: A submersible pump to circulate water from the tank to the grow bed.
    • Grow Media: Clay pebbles, gravel, or lava rock are excellent choices for supporting plant roots.
    • Plumbing: Tubing or pipes to connect the pump to the grow bed and allow water to drain back into the tank.
    • Fish: Goldfish, guppies, or other small, hardy fish suitable for aquaponics.
    • Plants: Leafy greens like lettuce, spinach, or herbs like basil are easy to grow.
    • Fish Food: High-quality fish food to provide nutrients for the fish.
    • Water Testing Kit: To monitor water parameters like pH, ammonia, nitrite, and nitrate.
    • Optional: Air pump and air stone for added aeration.
    Step 1: Setting Up the Fish Tank: Begin by choosing a location for your aquaponic system that receives adequate sunlight but is not in direct, intense sunlight all day. Rinse the fish tank thoroughly with water (no soap!). Place the tank on a level surface. Add dechlorinated water to the tank. Dechlorination is crucial to prevent harming the fish.
    Step 2: Creating the Grow Bed: Prepare your grow bed by drilling drainage holes in the bottom. The number of holes depends on the size of the bed, but ensure adequate drainage. Rinse the grow media thoroughly to remove any dust or debris. Fill the grow bed with the rinsed grow media.
    Step 3: Connecting the Plumbing: Place the grow bed above the fish tank. Position the submersible water pump inside the fish tank. Connect tubing from the water pump to the grow bed. Ensure the tubing reaches the top of the grow bed, allowing water to flow evenly. Create a drain system that allows water to flow back into the tank from the grow bed. This can be as simple as a pipe or tubing extending from the bottom of the grow bed back into the tank.
    Step 4: Cycling the System: Before adding fish, you need to "cycle" the system. This involves establishing a beneficial bacteria colony that converts fish waste into nutrients for the plants. Add a small amount of ammonia (fish food works too, just add a pinch and let it decompose) to the tank. Monitor the water parameters daily using the water testing kit. You'll notice ammonia levels rise, then nitrite levels, and eventually, nitrate levels. Once you see ammonia and nitrite levels consistently at zero and nitrate levels present, your system is cycled (this typically takes 2-6 weeks).
    Step 5: Introducing the Fish and Plants: Once the system is cycled, you can introduce your fish gradually. Start with a few fish and monitor their behavior. Add your chosen plants to the grow bed. Gently nestle the roots among the grow media. Space them according to their mature size.
    Step 6: Maintaining Your Aquaponic System: Regularly test the water parameters (pH, ammonia, nitrite, nitrate). Adjust as needed to maintain optimal levels for both fish and plants. Feed the fish regularly with high-quality fish food. Prune plants as needed to encourage growth and prevent overcrowding. Top off the water in the tank as needed to compensate for evaporation. Periodically clean the fish tank to remove excess debris. Perform partial water changes (about 25%) every few weeks to maintain water quality.
    Conclusion: Enjoy Your Aquaponic Garden! Congratulations! You've successfully built your own aquaponic fish garden. Enjoy the process of growing fresh produce and raising fish in a sustainable and rewarding way. Remember to monitor your system closely and make adjustments as needed. Happy growing!
    ```

    Fish For Your Aquaponic Garden

    Fish for your aquaponic garden aquasprouts.com

    Aquaponic Gardening

    Aquaponic gardening aquaponic-gardening.blogspot.com

    Aquaponic Fish Tanks

    Aquaponic fish tanks www.theaquaponicsource.com
     

    Aquaponics at Home Copyright © 2016-2022 -- Powered by Blogger